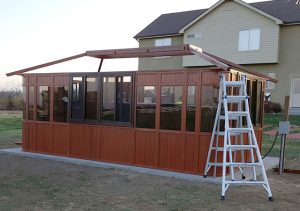
Here’s the thing nobody tells you before you order a gazebo: the assembly is the easy part. The hard part is convincing yourself you can actually do it.
Every Westview customer who’s left a review says some version of the same thing — they were nervous before they started, and pleasantly surprised by how straightforward the process was. A couple from Pittsburgh had “never built anything like this” and finished in under 5 hours. A self-described “klutz” and his neighbor got theirs done the same day they started. A wife and husband team in Minnesota, working on a 12×12, had the walls up in four and a half hours.
You can do this. Here’s exactly how.
Before You Start: What You Need
Tools
The tool list is short. Westview’s prefab panel system is designed so you don’t need a workshop full of equipment:
- Power drill with Phillips head bit (this is your primary tool — you’ll use it constantly)
- Flexible drill bit extension (very helpful for tight spaces, especially on the roof)
- Tape measure
- Step ladder or platform (tall enough to reach the roof — two ladders is even better)
- Level
- Wood clamps (optional but recommended for holding panels in place while you fasten them)
- Rubber mallet or hammer (optional, for nudging panels into alignment)
That’s it. No saw. No specialized hardware. Every screw, bolt, bracket, and panel comes in the crate, pre-cut and pre-drilled. If you can operate a drill and climb a ladder, you have the skills for this job.
People
Two people minimum. Almost every phase of the gazebo installation DIY can be done by two people working together. The one exception everyone mentions is the roof — getting the roof frame up and onto the walls is significantly easier with 3–4 people. One customer put it simply: “When you put the roof frame up it is better to have 4 people so each can grab a corner.”
Plan to have your extra hands available for the roof phase. The rest of the day, two people is plenty.
Foundation
Your foundation needs to be ready before the gazebo is built. Concrete slab, reinforced wood deck, or pavers — it must be level, slightly larger than the gazebo’s exterior dimensions, and strong enough to support the combined weight of the structure and your hot tub. We cover this in detail in our Foundation Guide.
The Assembly Process: Step by Step
Step 1: Unpack and Organize Everything
The gazebo arrives in one large steel-framed crate. Unpacking takes about 30–60 minutes. One experienced customer’s advice: “Take your time organizing parts and pieces. There are A LOT and you’ll be glad you did.”
Every panel, window, door, and hardware bag is labeled. Lay everything out on the ground or foundation pad so you can see all the pieces and match them to the instruction manual before you start building. This step feels slow but saves hours of confusion later.
Pro tip: One Minnesota couple advertised the steel packing frame for free as a firewood storage rack — it was gone the same day. Don’t throw it away until you’ve considered repurposing it.
Step 2: Assemble the First Corner
Start with one corner. Stand two wall panels up, square them, and fasten them together. This is the scariest moment — it feels wobbly and uncertain. That’s normal.
Once that first corner is standing, everything clicks. One Colorado 12×20 owner described the feeling perfectly: “We were concerned about the price and the fact that we did not have any construction experience. When we unpacked all of the parts and pieces it was overwhelming. Once the first corner was standing and we started putting together other sections, the building started taking shape quicker than we thought.”
Step 3: Build Out the Walls
Continue adding wall panels, window sections, and the door frame one at a time. Each panel connects to the previous one with screws through pre-drilled holes. The modular system means you can place the door on any side — decide this now based on your hot tub layout, step placement, and access path from the house.
Critical tip from a veteran installer: “Don’t tighten the bolts too much until the entire gazebo is completely assembled and anchored.” Leave everything finger-tight during assembly. Final tightening happens after everything is square and level.
Step 4: Install the Roof Frame
This is the most physically demanding step and the one where extra help earns its keep. The roof frame needs to be lifted up and set onto the wall structure. With two people, it’s doable but awkward. With four, each person grabs a corner and it goes up smoothly.
One Colorado 12×16 owner noted: “Relatively easy to assemble if you have at least a small amount of mechanical aptitude — took me and one helper about 8 hours to assemble, including anchoring.” The roof phase was a portion of that total time.
Step 5: Attach Roof Panels and Skylight
With the frame in place, screw in the Duraflex roof panels and skylight. This is done from the top, so you’ll be on the ladder. Having one person inside and one outside makes panel alignment much easier — a tip that appears in multiple customer reviews.
One customer recommended caulking the roof screws during assembly to prevent any chance of leaks. They reported zero leaks after their first rainstorm. Not required by the instructions, but a smart preventive step.
Step 6: Anchor to the Foundation
Westview provides anchor brackets with every gazebo. Since foundations vary (concrete, wood, pavers), the specific fasteners for your surface type are purchased separately at any hardware store. Anchor hooks, anchor bolts, or concrete screws all work depending on your setup.
Once the gazebo is fully assembled and squared up, now is the time to do your final tightening of all bolts and then anchor to the pad. This locks everything into place and activates the full wind resistance rating.
Step 7: Install Windows, Doors, and Finishing Touches
Slide in the aluminum-framed windows, hang the French doors, and install the anchor brackets. The windows and doors use the same modular track system — they slide in and lock. No special tools required.
Once everything is in place, test all windows and doors for smooth operation. If anything binds, a slight adjustment to the frame screws usually fixes it. Westview’s phone support is available for troubleshooting during assembly.
Real Assembly Times from Real Customers
| Model | People | Time | Notes |
| Zento 10×10 | 2 | 3–5 hours | Smallest, quickest build |
| Brentwood 10×10 | 2 | 5–8 hours | More windows to install |
| Colorado 12×12 | 2 | 4.5–8 hours | Walls up in 4.5 hrs |
| Aspen 12×14 | 2 | 6–10 hours | 10 hrs for first-timers |
| Colorado 12×16 | 2 | 8 hours | Including anchoring |
| Aspen 12×16 | 2 | 1–2 days | Walls day 1, roof day 2 |
| Colorado 12×20 | 2 | 1.5–2 days | Largest, most panels |
| Brentwood 16×28 | 2+ helper | 2+ days | Clear instructions helped |
Times vary based on experience, weather, and how carefully you follow instructions. First-time builders consistently report longer times but successful outcomes.
5 Things That Slow You Down (And How to Avoid Them)
- Skipping the layout step. Don’t start building until every piece is unpacked, labeled, and organized. The 30 minutes you spend here saves 2 hours of searching later.
- Over-tightening too early. Leave bolts loose until the full structure is assembled. Tightening as you go makes later panels harder to align.
- Not having enough ladders. Two ladders is better than one. For the roof phase, having one on each side makes a huge difference.
- Ignoring the weather forecast. Don’t start assembly in rain or high wind. A calm, dry day makes everything easier and safer.
- Going it alone on the roof. Two people can handle the walls. Recruit 1–2 more for the roof lift. It’s one hour of their time and saves you from a dangerous struggle.
Need help mid-assembly? Westview’s customer service team (1-800-895-1972) is available Monday through Friday and has talked thousands of customers through tricky steps over the phone. You can also browse customer installation photos to see completed builds from real owners.